
Part 1: Introduction to Banana Split Cake Recipe
Looking for a fun, indulgent dessert to wow your friends and family? The banana split cake is the answer! It brings all the classic banana split flavors into a cake form, perfect for any occasion. With creamy ice cream, fresh bananas, and crunchy nuts, it’s as beautiful as it is delicious.
Banana split cakes are easy to make and highly versatile. You can customize them to suit dietary preferences—whether vegan, gluten-free, or with your own unique toppings. In this guide, we’ll show you how to make it from scratch, step by step, for the ultimate homemade treat.
Let’s dive into the details and learn all about this fantastic treat!
1.1 What is a Banana Split Cake recipe ?
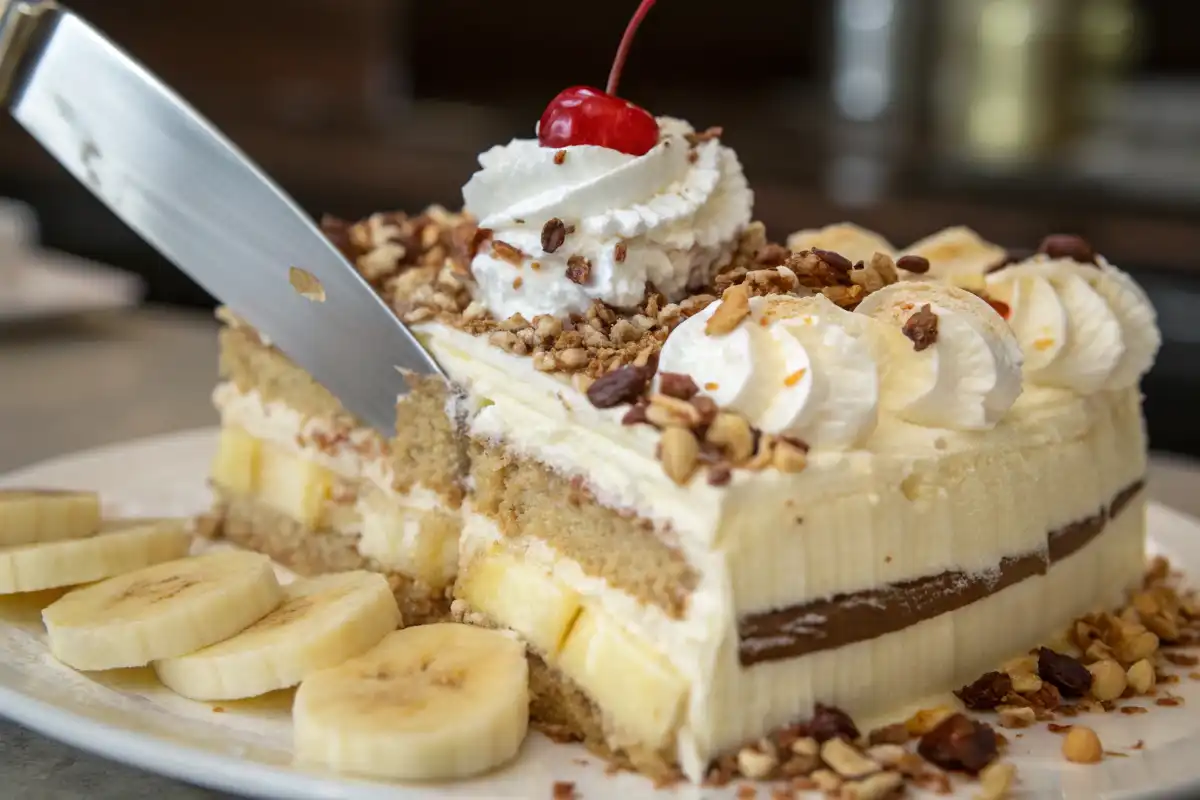
A banana split cake is a no-bake, layered dessert inspired by the classic banana split sundae. Picture creamy ice cream with fresh bananas, topped with whipped cream, nuts, and syrup – all in cake form! It’s a perfect mix of creamy, sweet bananas, and crunchy nuts with a graham cracker crust.
This cake version is usually served chilled, making it a refreshing treat for hot days or special celebrations. Whether it’s a birthday, a family gathering, or a simple weekend indulgence, the banana split cake never fails to impress with its vibrant colors and decadent taste.
1.2 Why Banana Split Cake is Perfect for Any Occasion
The beauty of a banana split cake recipe lies in its versatility. It can easily be adapted to any event, from casual get-togethers to more formal celebrations. It’s an ideal dessert for potlucks or barbecues, as it serves a crowd and requires minimal effort. Plus, it looks absolutely stunning when sliced, with all the layers visible.
Whether you’re hosting a birthday party or simply want to surprise your family with something sweet, this dessert is bound to be a hit. Since it’s no-bake, it’s incredibly easy to prepare, leaving you with more time to enjoy the event or relax. You can even prepare it ahead of time, as it stores well in the fridge!
1.3 Key Ingredients in Banana Split Cake
So, what goes into this mouth-watering banana split cake? Let’s take a look at the essential ingredients that bring the flavors together.
- Bananas: The star of the show! Bananas add that natural sweetness and slight creaminess that pairs perfectly with the other elements of the cake.
- Graham crackers: They form the base, giving the cake a crispy, buttery crunch.
- Ice cream: You’ll need different flavors, traditionally vanilla, chocolate, and strawberry, to replicate the original banana split sundae.
- Whipped cream: Light and fluffy, it adds a rich, smooth layer to the cake.
- Chocolate syrup: A drizzle of chocolate syrup on top of the cake is key for that decadent touch.
- Chopped nuts: Walnuts or peanuts work best, giving the cake a nice crunch and balancing the sweetness.
These are just the basics, but you can definitely get creative with your toppings or swap out ingredients to suit your taste! The possibilities are endless, and that’s part of what makes this dessert so fun to make.
Part 2: Step-by-Step Banana Split Cake Recipe

2.1 Preparation Time & Difficulty Level
Making this banana split cake is a breeze, and it doesn’t require any baking skills! You’ll need around 20 minutes of prep time, plus about 3 hours for chilling to ensure everything sets perfectly. The difficulty level is easy, so it’s perfect for beginner bakers or anyone who wants a quick dessert without too much fuss. If you can layer ingredients, you’ve got this!
2.2 Detailed Recipe Instructions
Ready to whip up your very own banana split cake? Follow these simple steps, and you’ll have a stunning dessert that’s sure to wow everyone!
2.2.1 Step 1: Preparing the Base
Start by creating the base for your cake, which will hold all those delicious layers together. For the crust, grab 1 ½ cups of graham cracker crumbs and mix them with ¼ cup of melted butter. If you like a richer base, you can add a tablespoon of sugar. Mix the ingredients until they’re well-combined and the texture resembles wet sand.
Next, press the mixture into the bottom of a 9×13-inch baking dish, forming an even layer. Use the back of a spoon to press it down firmly. This will serve as the foundation of your banana split cake.
2.2.2 Step 2: Layering the Bananas
Now it’s time to add the bananas! Take 2-3 ripe bananas and slice them into thin rounds. Arrange the banana slices evenly over the graham cracker crust. Make sure the bananas cover the entire surface, as their natural sweetness will seep into the crust, making every bite even better. Bananas are a must in this banana split cake recipe, so don’t skimp on them!
2.2.3 Step 3: Adding the Ice Cream Layers
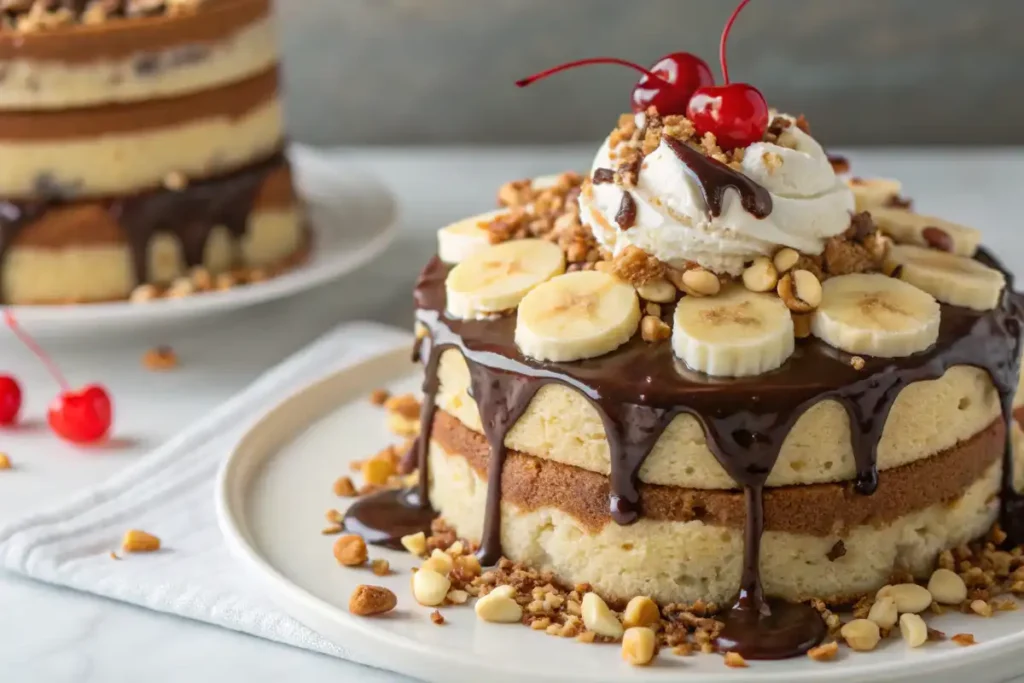
This step is where the magic happens! Take 1 ½ cups of softened vanilla ice cream, 1 ½ cups of chocolate ice cream, and 1 ½ cups of strawberry ice cream. Layer each flavor of ice cream one by one over the bananas. Spread each layer evenly with a spatula, smoothing the ice cream all the way to the edges of the dish.
If you want to make it a little easier, you can let the ice cream soften a bit more, so it spreads smoothly without cracking. But don’t let it get too soft, or you might end up with a melted mess!
2.2.4 Step 4: Assembling with Toppings
Once your ice cream layers are set, it’s time to top off your banana split cake. Start by spreading 2 cups of whipped cream evenly on top of the ice cream layers. You can use store-bought whipped cream or make your own, whichever you prefer!
Next, drizzle chocolate syrup generously over the whipped cream. Then, sprinkle ½ cup of chopped walnuts (or peanuts, if you prefer) over the top for that signature crunch. Finally, finish it off with a few maraschino cherries for a pop of color and a fun, classic touch.
2.2.5 Step 5: Chilling & Serving
Cover the banana split cake with plastic wrap and refrigerate for at least 3 hours. This helps the flavors meld and the ice cream firm up for easier slicing. If you’re short on time, chilling for 1 hour works, but the longer it sits, the better it gets!
When ready to serve, slice into squares and watch everyone marvel at its beauty and taste! Store leftovers in the fridge, but don’t let them sit too long—you’ll want to savor every bite!
Part 3: Variations of the Classic Banana Split Cake Recipe
The traditional banana split cake is tasty on its own, but there are many ways to customize it for different tastes and dietary needs. Whether you’re following a specific diet or just want a twist, here are some fun variations to try.
3.1 Vegan & Dairy-Free Banana Split Cake
If you’re looking for a vegan banana split cake or need a dairy-free version, don’t worry – it’s just as easy to make a plant-based alternative!
- Vegan ice cream: Choose your favorite dairy-free ice cream, such as coconut milk-based or almond milk-based varieties. You can even opt for fruit sorbets if you want a lighter alternative.
- Dairy-free whipped topping: Many stores carry coconut cream or soy-based whipped toppings, which can perfectly replace traditional whipped cream.
- Vegan crust: Swap out the regular graham crackers with vegan-friendly graham crackers or use crushed gluten-free cookies for the base.
With these swaps, you can still enjoy the layers of flavor and texture that make this dessert so irresistible, while keeping it completely dairy-free and plant-based. Plus, it’s a great option for anyone with lactose intolerance or those following a vegan lifestyle.
3.2 Gluten-Free Banana Split Cake recipe
If you’re following a gluten-free diet, you can easily modify this banana split cake recipe to make it safe for everyone. Here’s how:
- Gluten-free graham crackers: Look for gluten-free graham cracker crumbs, or make your own using gluten-free crackers. Some brands even offer pre-crushed gluten-free graham cracker crumbs to make the process quicker.
- Gluten-free ice cream: Most ice creams are naturally gluten-free, but be sure to double-check the labels for any hidden gluten ingredients.
- Gluten-free whipped topping: Most whipped creams are gluten-free, but just to be safe, check the ingredient list.
By using gluten-free alternatives for the standard ingredients, you can still create a delicious, layered dessert that everyone can enjoy, regardless of dietary needs.
3.3 Fun Add-ins to Customize Your Banana Split Cake recipe
One of the best parts about this dessert is that you can truly make it your own! Here are some fun add-ins to jazz up your banana split cake:
- Crushed cookies: Add some texture and sweetness with crushed Oreos, chocolate chip cookies, or even graham crackers to the layers. It’ll give your cake an extra crunch and make it even more indulgent.
- Caramel sauce: For a richer twist, drizzle caramel sauce over the ice cream layers or top with a spoonful of caramelized bananas for an added flavor boost.
- Berries: For a fresh, tangy contrast, layer some strawberries or blueberries in with the bananas. Not only will they add a burst of color, but they’ll provide a fruity bite that complements the sweetness of the cake.
- Toffee bits or chocolate chips: Sprinkle some chocolate chips, mini marshmallows, or even toffee bits for a gooey, chocolatey surprise in every bite.
These simple add-ins take your banana split cake from delicious to extraordinary, letting you customize it to your liking and add new textures and flavors.
With these variations, your banana split cake recipe will never get boring. Try one or all of these options to create a personalized dessert that everyone will rave about. But the fun doesn’t stop here! Let’s continue with some essential tips and troubleshooting advice to ensure your banana split cake is always a hit.
Part 4: Tips & Troubleshooting for the Perfect Banana Split Cake recipe
When making a banana split cake recipe, it’s important to get the details just right. The layers should be smooth, the crust should be firm, and the ice cream should stay cold and set. If you’re new to this dessert or want to make sure everything goes smoothly, here are some helpful tips and common mistakes to avoid.
4.1 Ensuring a Perfect Layered Look
One of the best parts about a banana split cake recipe is the beautiful, vibrant layers. To ensure your layers come out just right, follow these tips:
- Press the crust firmly: When you’re preparing the graham cracker crust, make sure to press it down evenly and firmly using the back of a spoon. This will prevent it from being too crumbly once the cake is chilled and will help it hold together better when you slice it.
- Layer the bananas evenly: Slice the bananas as evenly as possible, and make sure to distribute them across the entire crust. This will ensure each slice of cake gets the right balance of banana and crust.
- Let ice cream soften slightly: To avoid cracking the ice cream while spreading it, allow it to soften a bit before layering. You want it to be spreadable but not too runny. Work quickly once it’s softened, so it doesn’t melt.
- Don’t over-layer: Be cautious not to overfill the layers. Although it’s tempting to pile on more ice cream, whipped cream, or toppings, too much of any ingredient can cause the layers to collapse or turn mushy.
By keeping things even and balanced, your banana split cake recipe will look just as good as it tastes!
4.2 Storage & Keeping the Cake Fresh
Leftovers? No problem! The banana split cake recipe stores wonderfully in the fridge, and it’s the perfect dessert for making ahead of time.
- Storage in the fridge: After you’ve assembled the cake, cover it tightly with plastic wrap or aluminum foil and store it in the fridge. This will keep the layers intact and prevent the ice cream from melting too quickly.
- Freezing for longer storage: If you want to store the cake for longer, you can freeze it! Simply place the cake in an airtight container or wrap it tightly with plastic wrap, and store it in the freezer for up to 2 weeks. When you’re ready to eat it, let it thaw in the fridge for about 30 minutes before serving.
- Serving cold: Serve the banana split cake cold from the fridge or freezer, and slice it while it’s still firm to get the best presentation.
For the freshest taste, try to eat the cake within a few days, as the bananas can get mushy if left for too long. But honestly, that’s a good excuse to make another batch!
4.3 Common Mistakes to Avoid
Even though this recipe is super simple, there are still a few mistakes you’ll want to avoid to ensure your banana split cake turns out perfectly:
- Using overripe bananas: While ripe bananas are perfect for this dessert, overripe bananas with brown spots will break down too much and become mushy. Aim for bananas that are ripe but firm.
- Not chilling long enough: If you don’t chill the cake long enough, it might fall apart when you slice it. Make sure to chill it for at least 3 hours—this allows the ice cream to firm up and the layers to set.
- Over-softening the ice cream: If you leave the ice cream out for too long before layering, it will melt and become too runny, making it difficult to layer and spread evenly. Let it soften just enough to spread easily—about 5-10 minutes.
- Skipping the crust: The graham cracker crust isn’t just for looks—it provides the base for your cake, giving it structure and texture. Don’t skip this step, or your banana split cake might not hold together properly!
By avoiding these common mistakes, your banana split cake recipe will be smooth, perfectly layered, and a delicious treat from start to finish.
You May Also Like :
The Ultimate Guide to Making Delicious Apple Spice Cake
FAQs
What is the difference between banana split and upside down banana split?
A banana split is a classic dessert made with sliced bananas topped with scoops of ice cream, whipped cream, chocolate syrup, nuts, and a cherry. You serve it in a long dish with the ingredients layered on top of the banana.
An upside-down banana split flips the traditional presentation. In this version, you layer the ingredients in reverse, placing the bananas on top, followed by the ice cream, with all the toppings on the bottom. It still has the classic banana split flavor but offers a fun twist in the presentation!
What does banana replace in a cake mix?
Bananas can be used as a natural substitute for eggs or oil in cake mixes, especially in healthier baking. If you’re making a cake and need to replace eggs, mash up ½ to 1 banana for each egg, or replace the oil with mashed banana for added moisture and flavor. This works well in many cake recipes, especially for banana-flavored cakes or vegan alternatives.
What is a split cake?
A split cake typically refers to a dessert made by layering ingredients to resemble a banana split, like the banana split cake we’ve been discussing. It’s not a cake you “split” into parts, but rather a layered dessert where flavors and textures come together, usually with a banana-based flavor profile. You can serve it as a no-bake dessert, making it a popular choice for quick, crowd-pleasing treats.
What does banana split taste like?
A banana split tastes like a rich, creamy combination of sweet ice cream, fresh bananas, and crunchy nuts, all topped with syrup and whipped cream. It’s the ultimate indulgence, with the sweetness of the bananas balanced by the smooth ice cream, the crunch of the nuts, and the tangy sweetness of the maraschino cherry. Each bite is a perfect mix of textures and flavors that will remind you of your favorite ice cream sundae.
Conclusion
There you have it! Now you know how to make a delicious banana split cake recipe that’s perfect for any occasion. Whether you go for the classic recipe or experiment with variations like vegan, gluten-free, or custom add-ins, this dessert is sure to be a hit with everyone. Remember to follow the tips for layering, chilling, and storing, and you’ll have a perfect dessert every time.
So, gather your ingredients, get creative, and treat yourself and your loved ones to a delicious, indulgent banana split cake recipe! Enjoy!